Schedoule
👀 Overview
Schedoule is a prototype of a roster management application with the core functions are roster assignment on an interactive calendar and QR code scanning for employees to clock in and clock out.
🔗 Links
Github: click here
Demonstration video: click here
🔥 The tech stack
- Front-end: NextJS, ReactJS, Zustand
- Back-end: NodeJS, Express
- Database: Mongo, Redis
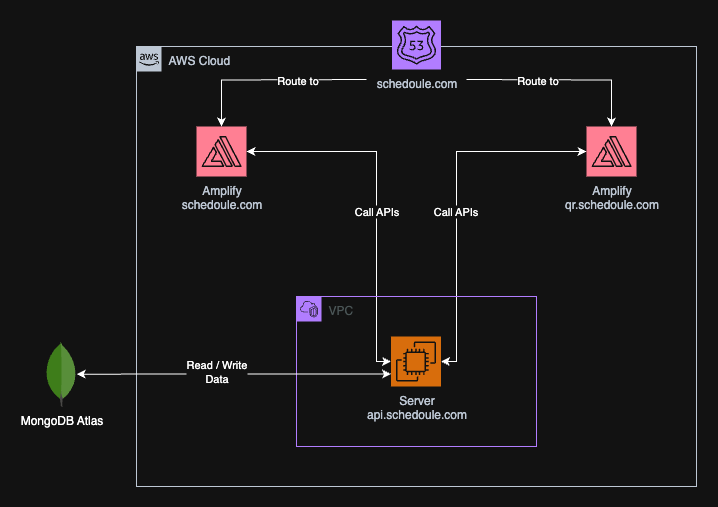
💻 Application structure
- schedoule.com: Main site for both employee and business owner.
- qr.schedoule.com: This site is the QR code generator and is open at business workplace for employees to scan the QR code.
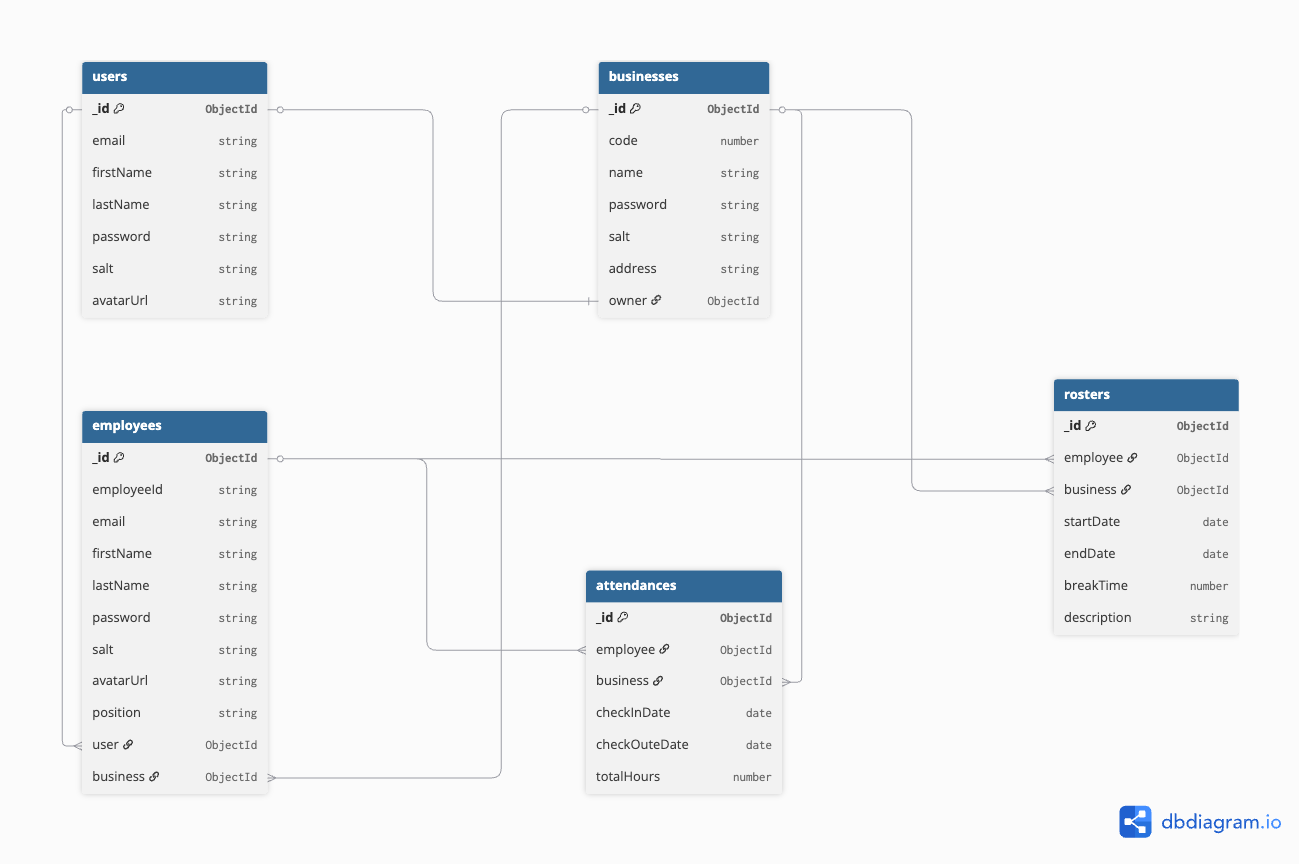
💾 Database structure

💡 QR Code implementation
Step 1: Hashing the QR code content
Generate a random string as a salt for hashing
function generateSalt() {
  return crypto.randomBytes(16).toString("hex").normalize();
}- Generate QR code using qrcode library
function generateQRCode(businessId: string, salt: string) {
	// Using crypto to generate QR code token with the salt
  	const token = crypto
    .createHmac("sha256", salt)
    .update(businessId)
    .digest("hex")
    .slice(0, 10); // Shorten for simplicity

	// Concatenate a string to an API endpoint with the QR Code token as a param
	const qrURL = `${process.env.CLIENT_URL}/attendance?token=${token}`;

	// Return the QR with a format data:image/png;base64,...
  	return await QRCode.toDataURL(qrURL, {
    	errorCorrectionLevel: "L",
    	type: "image/png",
    	scale: 10,
  	});
}
Step 2: Create an API endpoint to get the QR code
const getQRCode = async (req: Request, res: Response) => {
 	try {
  		const businessId = req.userId;

		// Try to get QR code data from Redis by the Business ID
  		const value = await redisGet(`qr-code:${businessId}`);

		// Set a new value to Redis if there is no existing QR Code
  		if (!value) {
    		const salt = generateSalt();
    		const qrCode = await generateQRCode(businessId, salt);
    		await redisSet(
      			`qr-code:${businessId}`,
      			JSON.stringify({ salt, qrCode }), // Set both salt and qrCode
      			30 // Valid for 30 seconds
    		);
    		res.status(200).json({
      			new: true,
      			qrCode: qrCode,
    		});
    		return;
  		}

		// Otherwise return the existing QR code
  		const { qrCode } = JSON.parse(value);
  		res.status(200).json({
    		new: false,
    		qrCode: qrCode,
    		ttl: await redisTTL(`qr-code:${businessId}`), // Return the remaining time
  		});
  	} catch (error: any) {
    	console.log(error);
    	res.status(500).json({ error: error.message });
  	}
};
Step 3: Display the QR code using <img /> tag
<img src={qrCode} alt="QRCode" />
Step 4: Employee check in API endpoint
export const checkIn = async (req: Request, res: Response) => {
	try {
		// Get QR code token sent from the client
		const {token} = req.body;

		const businessId = req.userId;

		// Get salt from Redis to compare
		const tokenToCompare = await redisGet(`qr-code:${employee.business}`);
		const { salt } = JSON.parse(value);

		// Regenerate the token using the same salt to compare
		const validToken = crypto
      		.createHmac("sha256", salt)
      		.update(employee.business.toString())
      		.digest("hex")
      		.slice(0, 10);

		// Compare the tokens then return if they are not the same
		if (data.token !== validToken) {
      		res.status(400).json({
        		error: {
          		type: "system",
          		message: "This QR code is invalid!",
        		},
      		});
      		return;
    	}


		// Insert the record to the database if tokens are valid

	} catch (error: any) {
    	console.log(error);
    	res.status(500).json({ error: error.message });
  	}
}
🚀 Simple AWS Deployment

- Route 53: Manages all essential DNS settings.
- Amplify: Hosts and manages both client sites, with generated SSL certificates managed by Amplify.
- EC2: For hosting the main server, configured with Nginx as a reverse proxy to the main server Docker container.
- MongoDB Atlas: A simple database hosting solution.
Thank you for reading!